Introduction to Android Development
A beginners' introduction to the world of Android
application
development.
I suppose you are reading this on an Android device or plan on getting one.
Whether it is a smartphone, a smartwatch on your arm/wrist, a tablet, an
Android Auto, chances are that you are using an app for whatever task you are
trying to accomplish. From setting an alarm, calculating your change, writing
a note, texting, watching a video, listening to an audio or the radio, to
reading this article, chances are that you are using an app built purposely
for the task.
- Do you know how an Android app is developed?
- Do you want to know how an Android app works?
If you fit any of the aforementioned profiles, or better yet want to know
how to build an Android app to accomplish that task on your mind, follow
along, if that is not the case, tag along all the same.
Who knows what might happen?!
This
Beginner Android Development series of guides (starting with this
blog article) is designed to enlighten you with the knowledge and tools to
start building your own Android apps.
Content
What is Android Development?
Android Development, otherwise termed Android App Development,
Mobile App Development, or Native Android Development simply refers to the process of creating mobile applications for
devices running the
Android operating system. An Android Developer primarily programmes an Android app by coding/writing
in a programming language like Kotlin and/or Java.
Significance in Mobile App Industry
Android development has played a significance in the mobile app industry with
its widespread popularity and the number of Android users globally.
According to statistics (Statista):
- Android's share of mobile OS worldwide is ~71.4%
- The most popular Android version in July 2023 is Android 13
- Users can easily sideload apps on Android, without being restricted to the official Play Store only, compared to other platforms like the Apple iOS.
Role in Technology
Virtually all industries - healthcare, education, e-commerce, entertainment,
etc - have been impacted by Android development, enabling accessibility of
technology to a global audience. From navigation, productivity, social
networking to government, Android continues to play a significant role by
changing the way we communicate with peers, shop, keep patient records,
bank, access & share information. Android brings services (and goods,
technically) closer to us.
- Entertainment: Games (PUBG, Lords Mobile), music (Spotify), and video streaming apps (Twitch, YouTube) are popular among Android users.
- Productivity: There are many apps that can help people stay organized, manage their finances, and increase their productivity at work.
- Social Media: Social media platforms like Facebook, Twitter, and Instagram have official Android apps.
- Navigation: Maps, GPS, and directions apps can help users navigate unfamiliar places and find their way around.
- E-commerce: Shopping apps like Amazon, AliExpress, e-Bay, Flipkart, and Myntra have become increasingly popular on Android devices.
- Education: Many educational apps are available on the Google Play Store, from language learning apps to interactive educational games.
Versatility and Customisation
Android apps can be tailored to suit various purposes and industries -- a
productivity app to streamline work; a game to entertain; a utility app to
solve day-to-day problems. Android provides the canvas for developers to
develop whatever app is needed. This is in part due to its open-source
nature, which is a license that permits other developers (besides you) to
modify and/or redistribute an app, and even the operating system.
Overall, Android development enables the creation of a wide variety of apps
that can make people's lives easier, more productive, and more enjoyable.
Platform for Innovation
Android development is not just about building apps; it's about solving
problems and making life easier or more enjoyable for users. Its a platform
where
innovation
thrives, enabling developers to explore new ideas and technologies to build
apps that have a meaningful impact. That is why it is relevant to date, and
continues to be.
Why Learn Android Development?
"Mobile apps and smartphones are everywhere, with more people consuming media on phones than on laptops or other devices. People depend on their smartphones to access shopping and essential services. As a result, app development is becoming an increasingly important job function for a wide variety of companies. As an Android developer, you have the opportunity to reach billions of people in a meaningful way through apps on their phones and connected devices." (Grow with Google | Android Dev., 2021)
- People spend over 4-5 hours on their mobile devices (Mobiloud)
- Popularity: There are over 2.3bn Android users worldwide in 2022. This is expected to have risen to over 3.6bn in 2023 (Statista)
- Microsoft has announced integration of Android apps on Windows 11.
Why not give these users a reason to spend the time on your app?
Potential & Innovation for Building Apps
Native Android Development gives you the power to bring your app ideas to life. Learning Android development empowers you to create your own apps or even start your own app-based business. Whether you have a game-changing concept or a passion project, Android provides the canvas for your creativity. If you can think it up, there is every chance to build it up and deploy to many users on Android.
Prerequisites for Android Development
Development Tools
Android Studio is the Integrated Development Environment (IDE) on which Android development is done. While there have been other IDEs like Eclipse in the past, Android Studio is currently the officially supported IDE. It comprises features & tools you can use to effectively write, run, test, and debug your apps.
Basic Technical Requirements
You can run Android Studio on a computer running any of the following compatible Operating Systems: ChromeOS; Linux; macOS; Windows.
- A computer running at least:
- ChromeOS: 3.5
- Linux: 64-bit Linux distribution that supports Gnome, KDE, or Unity DE; GNU C Library (glibc) 2.31 or later.
- macOS: 10.14 (Mojave)
- Microsoft Windows: Windows 8, 64-bit.
- RAM: 8 GB
- CPU:
- ChromeOS: Intel i5 or higher (U series or higher).
- Linux: x86_64 CPU architecture; 2nd generation Intel Core or newer, or AMD processor with support for AMD Virtualization (AMD-V) and SSSE3.
- Mac: Apple M1 chip, or 2nd generation Intel Core or newer with support for Hypervisor Framework.
- Windows: x86_64 CPU architecture; 2nd generation Intel Core or newer, or AMD CPU with support for a Windows Hypervisor Framework.
- Disk space: 8 GB (for IDE, Android SDK, and Emulator only) on Linux, Mac and Windows; 20 GB on ChromeOS.
- Screen resolution: 1280 x 800.
- Stable power/electricity: Android Studio consumes a lot of computer resources. You need stable power in your workspace.
- Stable internet connection: to download libraries, tools and (learning) resources.
- A mobile device to test apps on. You could use the emulator instead.
- (Optional) A USB cable to connect mobile device to your computer. You could use Wi-Fi instead. Latest versions of Android Studio support wireless debugging, which enables you to install apps from your computer to your mobile device wirelessly.
The aforementioned specifications are bare minimum requirements required to
run Android Studio. You should use a device with higher specifications (16 GB RAM, 16 GB disk space) for a
better, faster experience.
Especially if you want to run your apps on the emulator.
Programming Knowledge
While often not necessary to have prior experience with programming languages, this series requires familiarity with core programming concepts like variables, loops, and conditional statements. Better yet if you know Object-Oriented Programming -- classes, interfaces, functions/methods, inheritance, polymorphism, abstraction, etc.
Android Device or Emulator
You need either the emulator (a software) or a physical device running the Android Operating System to run & test your Android apps.
"The Android Emulator simulates Android devices on your computer so that you can test your application on a variety of devices and Android API levels without needing to have each physical device." (Android Developers).The emulator is just like having an Android device inside your computer. Further instruction will follow on setting up the emulator.
Resources for Learning
Learning Android development is an exciting journey, and there are numerous resources available to help you get started. There are a plethora resources on Android development basics in the form of books, online tutorials, courses, and official documentation that cater to beginners. There are also internships and bootcamps (like the recently paused Google Africa Developer Scholarship, GADS), so you should be on the lookout around communities like Google Developer Groups in tertiary institutions.
- Kotlin Bootcamp for Programmers (Udacity)
- Android Kotlin Developer (Nanodegree Program | Udacity)
- Android Basics in Kotlin (Online Course | Android Developers)
- Advanced Android with Kotlin (Nanodegree Program | Udacity)
- Developing Android Applications with Kotlin (Online Program | Pluralsight)
- Meta Android Developer Professional Certificate (Online Course | Coursera)
- Kotlin for Android Tutorial (Online Tutorial | GeeksforGeeks)
- Modern Android App Development with Kotlin (Educative)
- Real Android App Dev in 15 Hours|KotlinDevX Certificate 2023
- Programming Android with Kotlin (advanced Book)
Setting up Expectations
It's vital that you set realistic, achievable goals as you begin your Android development journey. The journey can be daunting, but remember that every obstacles are faced in every journey and any hurdle you surmount is an opportunity to learn and grow. Embrace the process, and don't be afraid to make mistakes along the way.
Android Development Languages and Frameworks
Java or Kotlin ± XML
Android app development can be done using Java and/or Kotlin. While both are supported for Android development and are interoperable with each other (meaning you can combine Java and Kotlin code in your app), it's helpful to have knowledge of at least one of these programming languages.
Android apps were originally built using Java (many still are), but after Google announced support for Kotlin as the official supported language for Android Development in 2017, many resources you will find online today are either made in Kotlin or shifting from Java to Kotlin. You can read about the history online.
Android Development Frameworks
While we focus on native Android development using Java and/or Kotlin, its worth mentioning there are other cross-platform frameworks that enable developers to build for multiple platforms (mobile, web, desktop,...) using a single codebase, but they are distinct from native Android development. The frameworks include Corona, Flutter, Ionic, JQuery Mobile, NativeScript, React Native, Xamarin and probably many other less popular solutions.
Native Android works best because its closest to the OS, the Android framework, and the hardware (mobile phone/tablet/watch) the app will be deployed on. No extra compilation or emulation steps are necessary for an app to get built and installed on a user device, and as such, apps you build would work seamlessly, leveraging the latest libraries built by Google; app sizes are also smaller; there is better user experience on native apps compared to the non-native; apps perform most efficiently and effectively when built natively.
 |
| Figure 1: Android System Architecture (Source: Android Basics by Google Nanodegree Program | Udacity) |
For further information on the technical details, read this page on Android Developers.
Choosing the Right Language
Selecting between Java and Kotlin would depend on your project and personal preferences which could be attributed to prior experience with programming. Nonetheless, Kotlin is often recommended for new projects. Its almost a decade since Google declared Kotlin as the official language for Android development.
Setting Up Your Development Environment
Before you embark on your Android app development journey, it's essential to set up a development environment that will enable you to create, test, and debug your apps efficiently. This section, will guide you through the process of getting your development environment up and running.
Install Android Studio
Android SDK
Upon running Android Studio, you will be greeted by a configuration screen, which prompts you to configure theme (light/dark), the Android SDK, and Virtual Device.
Android Software Development Kit (SDK), simply called the Android SDK comprises the debugger, libraries, and tools necessary for programming Android apps. Whenever Google releases an Android update (e.g. Android Pie, Android Q,...), a counterpart SDK is released to enable developers to build apps leveraging the features supported by the Android version (e.g. document/image/generic content printing, fingerprint authentication, multi-window support, data saver, multi-camera support, foldables support, 5G support, etc).
Download the Android SDK (necessary) and Virtual Device components (if you will be using the emulator). The next prompts enable you to configure the emulator.
Emulator vs. Physical Device
You have the option to test apps on an emulator or a physical Android device, as mentioned previously.
Its worth mentioning that an emulator runs on your machine and consumes more resources (battery, internet, RAM, disc space) alongside your Operating System, Android Studio, and other software running on your machine. On the other hand, a physical device consumes less of your machine's resources as it runs independent of your machine and only consumes power for maintaining connection (via a USB cable or wireless network) to your machine.
Configure Emulator for Testing
The following prompts help you set up the emulated device you would be using to run your apps.
 |
| Virtual Device Configuration - Emulated Hardware |
- Category: the type of hardware device you would be simulating -- phone, tablet, smartwatch, smart TV, or Android Auto.
- Density: measured in dots per inch (dpi) -- its the number of pixels per inch supported by the device display.
- Name: model of the hardware device -- old Nexus phones; recent Pixel phones/tablets; Wear OS Square; Android TV; a Desktop.
- Play Store: devices with the Google Play logo indicate availability of both the Google Play Store app and access to Google Play services -- you can install/update apps from the Play Store on these devices.
- Size: diagonal length of screen (in inches).
- Resolution: number of pixels per inch (ppi) of the screen.
 |
| Virtual Device Configuration - System Image |
This could look overwhelming, considering the number of images spread across the Recommended, x86 Images, and Other Images tabs, but your device should be fine running the recommended images. These images are basically Android Operating Systems you could install on your chosen Hardware (selected in previous menu). An active internet connection is required to download an OS image.
You could use the API level distribution chart (image below) to decide what OS to use on your emulated hardware.
 |
| Android Platform/API Distribution |
The statistics can help when you are developing apps - choosing between leveraging new features or targeting newer devices.
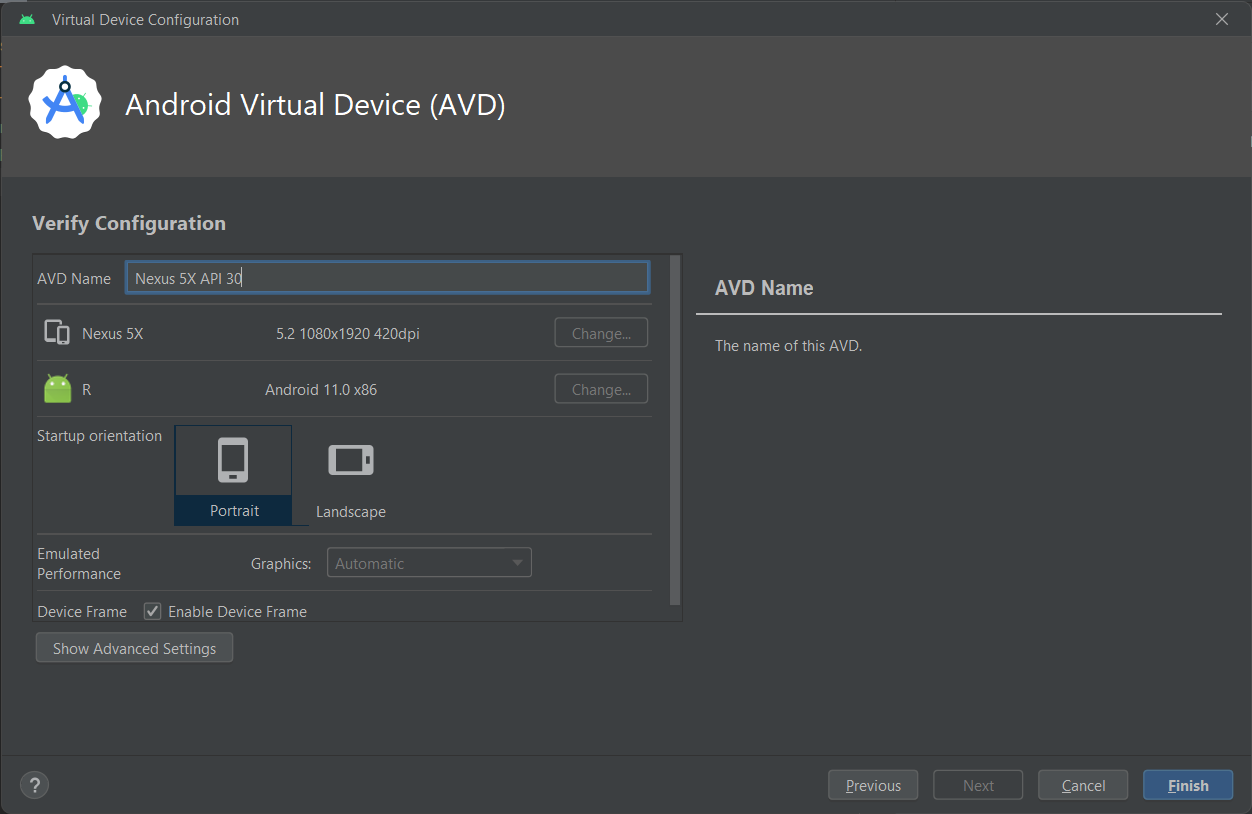 |
| Virtual Device Configuration - Verify Configuration |
- AVD Name: a name for your device, which appears in the Android Virtual Device (AVD) manager whenever you need to start it.
- Startup orientation: initial orientation the device appears when you boot it; it can be changed in the extended controls anytime.
- Camera: availability of camera and source of image on your hardware.
- none: forego camera installation.
- emulated: use a camera with simulated images.
- device: use webcam/built-in camera installed on host (the machine on which you're installing the emulator).
- Device Frame: a frame around the emulator window that mimics the look of a real device.
- Emulated performance
- Graphics: specifies graphic performance based on hardware Graphics Processing Unit (GPU) or software.
- Boot option
- Cold Boot: this option sets the emulator to turn off whenever you close it, and turn on again when you open it; its slower because booting loads all necessary processes afresh you switch on the emulator.
- Quick Boot: this option enables the emulator to save its current state when you close it, and load same state the next time you open the emulator; its faster because a snapshot of your current state (e.g. open apps,) is saved before exiting the emulator.
You can read more about the various properties here. After verifying the configurations are to your liking, you can proceed to installation by clicking on Finish. After downloading the necessary files, Android Studio may restart while installing. Upon completion, you are greeted by screen similar to the following (depending on your installed Android Studio version):
 |
| Android Studio Welcome Screen |
Your Android development environment is installed and you are now ready to get started developing apps on Android Studio.
Connecting a Physical Device
If you would be running your apps on a physical device, follow the instructions here to connect your Android device to Android Studio. It's relatively easier. Steps involved include:
- Enabling Developer Options on your device.
- Enabling USB/Wireless debugging.
- Connecting mobile device to machine via USB cable or Wireless network.
Create Your First Android Project
This is a brief walkthrough that will guide you through the process of setting up a simple "Hello World" Android project in Android Studio. Get hands-on experience by creating your first Android project "Hello World" app, introducing you to activities and layouts.
"Hello World" is a traditional phrase used in computer programming to illustrate the basic structure of a simple program; a "Hello World" program usually consists of a few lines of code that output the message "Hello, World!" to the screen or console; its typically one of the first programs written by developers when learning a new programming language or environment; its purpose is to ensure that the programming environment is set up correctly and can compile or run code.
Step 0: If Android Studio is not running, open it.
 |
| Welcome to Android Studio |
Step 1: Select Project Template
This is a template of the device you are targeting, and basic most-used layouts which will save you time and make your development faster. The default is Phone and Tablet (for target device) and Basic Activity (for layout).
We will be running an Empty Views Activity on a Phone, so select those and click Next.
 |
| New Project Template |
Step 2: Set up project.
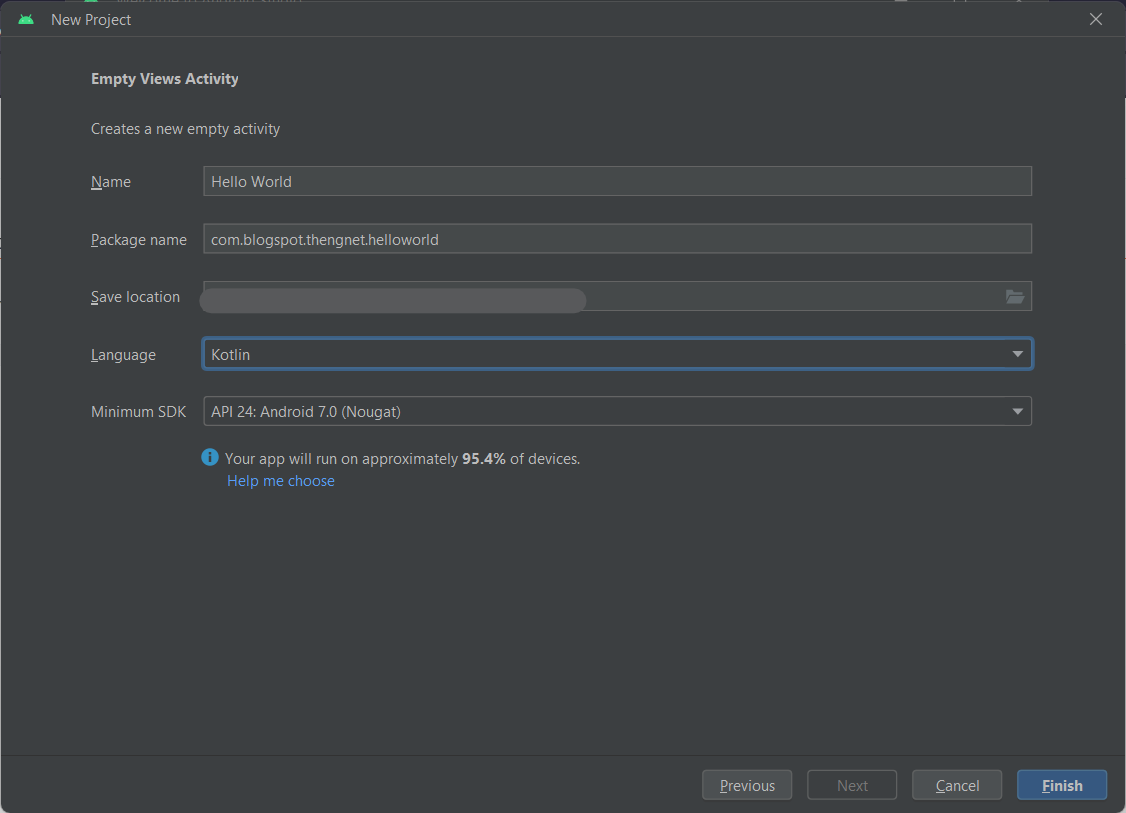 |
| Empty Views Activity setup |
Understanding App Properties
- Name: the name of your Android app; the title that will be shown on your device's launcher when the app is installed or the Google Play Store.
- Package name: a unique identifier; its often written in reverse domain format (e.g., "com.blogspot.thengnet.helloworld" for the NGNet blog). This identifier is used to distinguish your app from others and is essential when publishing to app stores.
- Save location: the directory on your computer where your project files will be stored. Choose a location that suits your organization and workflow. Default is (Home directory)>AndroidStudioProjects.
- Language: Your preferred choice between the two primary languages for Android development -- Java and Kotlin. Kotlin is the newer and increasingly recommended language for Android development due to its modern features (albeit Java may be catching up).
- Minimum SDK: specifies the lowest version of Android that your app is compatible with. Choose a minimum SDK version that aligns with the features and capabilities your app requires. Keep in mind that targeting older versions may limit access to newer features.
After making this setup, click on Finish. Android Studio will download required libraries and files to finish setting up the project. Make sure you have a stable internet connection at this point.
 |
| Project View | Code Editor |
 |
| Layout Editor |
The layout file describes the user interface (UI). It consists of a TextView (View) wrapped inside a ConstraintLayout (ViewGroup). A View is the most basic UI building block/element on Android; ViewGroup combines multiple View elements and positions them relative to other ViewGroups or View items. A ConstraintLayout allows you to define a layout by positioning and sizing Views in a flexible fashion. A TextView simply displays text on the screen.
Line 1; Line 2 declares the ConstraintLayout (androidx.constraintlayout.widget.ConstraintLayout); Lines 2-4 declares the namespace in which attributes (e.g. android:text) and expected value parameters (e.g. a string defined in quotes like "Hello World!") are defined; Lines 5-6 specify that the ConstraintLayout occupy the entire screen; Lines 10-11 specify that the TextView should take as much screen as its content "Hello World!" needs; Line 12 specifies the text - Hello World! - to display to the screen; Lines 13-16 specify the position of the TextView within the ConstraintLayout.
Enough of the technical jargon. Let's run the app.
Run App to Verify Your Setup
The following steps verify that the development environment is correctly set up by running the "Hello World" app on either the emulator or a physical device to ensure everything is functioning correctly.
- If you are using a physical device, this is the time to connect it to your machine. Android Studio should detect it.
If you have successfully set up the emulator, its name should be displayed on the dropdown toolbar item between app and the play icon.
If you want to choose between multiple devices, click the dropdown menu and select your preferred device. - Unlock your device screen if its locked.
- Click on the green Play button on the toolbar or press Shift + F10 on the keyboard to install and run your app.
If you are using the emulator, Android Studio will open it, and you should see an emulated Device Frame running in a pane inside the Android Studio or on a separate window.
A Run pane opens up from the bottom displaying details about the app build, installation, and eventual run/fail on your Android device or emulator. - Android Studio will build your app and deploy it to your device as soon as the debug build is ready.
 |
| Android Emulator |
Marvel at this before closing up your workspace, for if you followed this article, you have just run your first Android app!
That's all folks!
In this article, we have explored through concepts, the meaning of Native Android Development, reasons for learning it, prerequisites for becoming a native Android developer, and successfully set up our development environment and run our first Android app.
In subsequent articles, we will dive deeper into the Android Ecosystem and learn about more elements to gain a good grasp of the fundamentals that will enable us build Android mobile apps. Meanwhile, you could keep yourself busy by learning more about Kotlin in this Kotlin Bootcamp for Programmers course, or if you feel up to it, Android Basics in Kotlin.
Farewell, but not goodbye!
Great write up
ReplyDeleteGlad you think it is. Thanks!
Delete